Welder Duty Cycle Explained: Weld and Rest Minutes
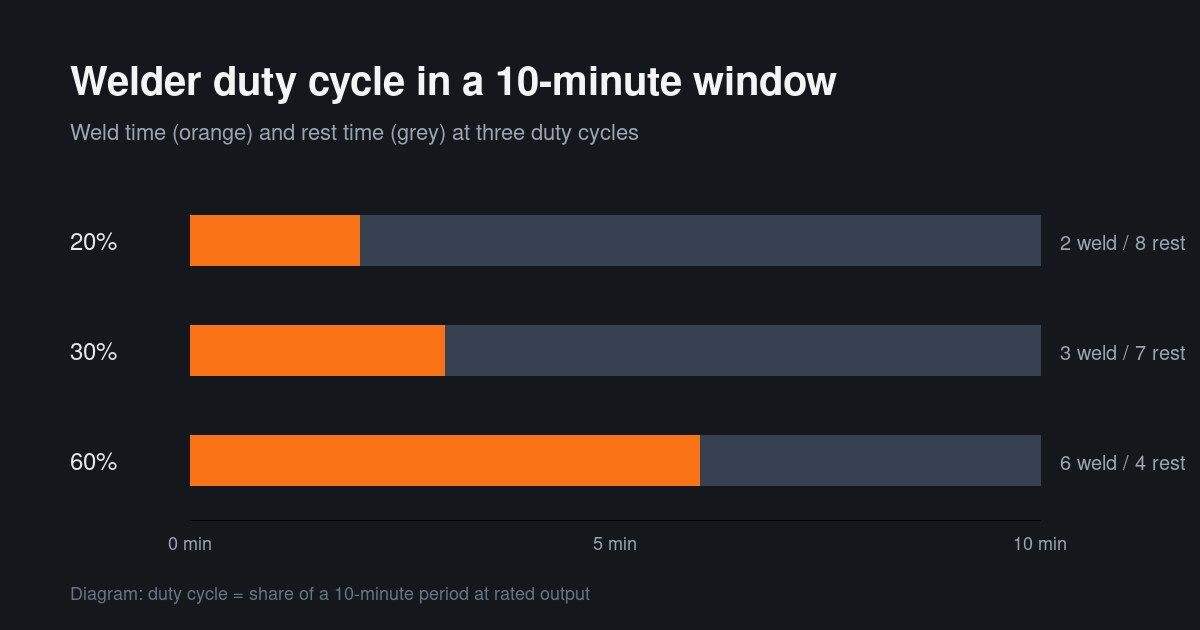
Welder duty cycle is the percentage of a 10-minute period that a welding machine can run at its rated output without overheating. A 30% rating means 3 minutes of welding and 7 minutes of rest at that current. Lower amperage allows more weld time, so check the rating plate for the amps that go with the percentage.
From the guide: Best Welding Machines: A Buyer's Guide for MIG, TIG, Stick, and Multi-Process
Welder duty cycle is the share of a 10-minute period that a machine can weld at its rated output before it must cool. It is the first spec to check when you compare machines in our welding machines buyer’s guide, because it decides how long you can keep the arc running.
This guide explains the definition, the formula and how to read a rating plate. To run your own numbers, use the welder duty cycle calculator.
What Does Duty Cycle Mean?
Duty cycle is the percentage of a 10-minute window that a welder can run at rated load without overheating. Miller’s owner’s manuals use that wording, and Lincoln Electric describes its ratings over the same 10-minute period.
A 30% rating therefore means 3 minutes of welding and 7 minutes of rest. A 60% rating means 6 minutes on and 4 minutes off. The window is a rating convention, not a timer inside the machine. Many welders protect themselves with a thermostat instead.
| Duty cycle | Weld minutes | Rest minutes |
|---|---|---|
| 20% | 2 | 8 |
| 30% | 3 | 7 |
| 60% | 6 | 4 |
| 100% | 10 | 0 |
Why Is the 10-Minute Window Used?
The rating comes from a standard test. Lincoln Electric says the NEMA test runs a power source at a set amperage at 40 C (104 F) for 10 minutes. Miller’s manuals note that output is derated above 104 F (40 C). A hot shop, dusty vents or low input voltage can therefore make a real machine do worse than its rating.
The Duty Cycle Formula
A machine heats roughly with the square of the current, so you can estimate the duty cycle at a different amperage:
New duty cycle = rated duty cycle x (rated amps / working amps)^2, capped at 100%
To find the highest current for continuous welding, use: rated amps x square root of (rated duty cycle / 100).
This is an estimate for planning. The duty-cycle chart in your manual overrides it, and the calculator labels every value that we have not confirmed against an official table as “Unconfirmed: check the official table”.
Worked example: Hobart Handler 210 MVP on 230 V
Hobart lists 150 A at 30% duty cycle on 230 V. Say you weld at 100 A instead.
- Ratio squared: (150 / 100)^2 = 2.25
- New duty cycle: 30% x 2.25 = 67.5%
- Minutes per 10: about 6.8 minutes welding and 3.2 minutes resting
For continuous work, 150 x square root of 0.30 = about 82 A.
Worked example: Miller Millermatic 252
Miller’s FAQ states 250 A at 60%. At 200 A the estimate is 60% x (250 / 200)^2 = 93.75%, so about 9.4 minutes of every 10. At the full 250 A it is 6 minutes on, 4 off.
How to Read a Rating Plate
The rating plate lists amps with a percentage, often written as “150 A at 30%”. Read it in this order:
- Input voltage. Dual-voltage machines list one rating per input. The Hobart Handler 210 MVP lists 150 A at 30% on 230 V but 90 A at 20% on 115 V.
- Process. MIG, stick and TIG ratings can differ, so match the line to what you are doing.
- Amps and percent together. Neither number means much alone.
- A 100% line, if printed. Some spec sheets give a second rating at 100%. Miller’s Millermatic 141 sheet lists 40 A at 100% beside 90 A at 20% (unconfirmed: check the official spec sheet).
110V vs 220V Duty Cycle
The same machine usually has a shorter duty cycle on household power. In Hobart’s figures, 115 V input gives 90 A at 20% while 230 V input gives 150 A at 30%. Our 110V vs 220V welders guide covers the circuit and breaker side of the choice.
What Happens When You Exceed It
Miller’s manual says that when a unit overheats, a thermostat opens, output stops and the fan keeps running. It advises waiting fifteen minutes and then reducing amperage or duty cycle before welding again, and it warns that exceeding the duty cycle can damage the unit and void the warranty.
If your welder trips, do not switch it off while it cools unless the manual says to. Then:
- Lower the amperage if the joint allows it.
- Plan rests on long seams instead of waiting for the shutdown.
- Keep vents clear and the machine out of direct heat.
- Check the starting settings by process and thickness to confirm you are not running higher than the joint needs.
Follow OSHA 29 CFR 1910.252 and your manual, and see our welding safety and PPE guide before long runs.
Which Duty Cycle Do You Need?
Hobby and repair work with short tacks and seams rarely reaches the limit of a 20% to 30% machine. Long production seams or heavy stick work at high amps call for 60% or more. Compare the amps at the duty cycle you will really use, not just the headline number, and use the process picker to narrow the process first.
Next Steps
Enter your own rating in the duty cycle calculator, then pick settings with the welding amperage calculator.
Disclaimer: This article is educational. Always follow your welder’s manual, rating plate and applicable safety standards.
| Duty cycle | Weld minutes | Rest minutes | Example rating (manufacturer-listed) |
|---|---|---|---|
| 20% | 2 | 8 | Hobart Handler 210 MVP: 90 A at 20% on 115 V |
| 30% | 3 | 7 | Hobart Handler 210 MVP: 150 A at 30% on 230 V |
| 60% | 6 | 4 | Miller Millermatic 252: 250 A at 60% |
| 100% | 10 | 0 | Continuous at the amps printed for 100% |
Read the amps printed next to the percentage. A 30% rating at 150 A says nothing about a different current, and at lower amps the same machine can run longer.
Questions we get
What does a 30% duty cycle mean on a welder?
A 30% duty cycle means the welder can run at its rated output for 3 minutes in any 10-minute period, then needs 7 minutes to cool. The percentage applies only at the amperage printed with it on the rating plate. Weld at lower amps and the machine can run longer before it overheats.
How long should a welder rest after its duty cycle?
Rest time is the rest of the 10-minute window, so 7 minutes at 30% and 4 minutes at 60%. If the machine overheats and shuts off, Miller's manual says to leave it powered so the fan runs and wait fifteen minutes, then reduce amperage or duty cycle before welding again. Follow your own manual.
Does duty cycle change with amperage?
Yes. Heating in the machine rises faster than the current, so a lower current gives a longer duty cycle and a higher current gives a shorter one. A common estimate scales the duty cycle by the square of the amperage ratio, but your manual's duty-cycle chart overrides any estimate. Use the calculator for planning only.
Why does my welder keep shutting off?
Most welders shut off when an internal thermostat opens because the machine has run past its duty cycle at your current setting. Miller says output stops while the fan keeps running. Let it cool, then lower the amperage, take longer rests, clear dust from the vents and check ambient heat. A shutdown that happens at low settings needs a service check.
How do I read the duty cycle on the rating plate?
Look for amps next to a percentage, such as 150 A at 30%, usually listed for each input voltage and process. Some plates also list 100% duty cycle with a lower amperage. Match the line to your input voltage and process, because the 120 V rating can be lower than the 240 V rating for the same machine, as Hobart's figures show.
Where we got this
- Miller Electric: Owner's manual, Duty Cycle and Overheating (OM-186359) (millerwelds.com)
- Miller Electric: Owner's manual OM-277115, Duty Cycle and Overheating (millerwelds.com)
- Lincoln Electric: Rugged Flexibility, Why Today's Inverter Technology Works on Construction Sites (lincolnelectric.com)
- Lincoln Electric: IM132 operator's manual (duty cycle based on a 10-minute period) (lincolnelectric.com)
- Hobart: Handler 210 MVP quick specs (pdf.directindustry.com)
- Miller Electric: Welder FAQ (Millermatic 252 at 60% duty cycle, 250 A) (millerelectricus.com)
- OSHA 29 CFR 1910.252: Welding, Cutting, and Brazing, General Requirements (osha.gov)
Keep reading
- Best Welding Machines: A Buyer's Guide for MIG, TIG, Stick, and Multi-Process
Compare MIG, TIG, stick, and multi-process welding machines by duty cycle, 110V vs 220V input power, amperage range, and shop use.
- 110V vs 220V Welders: Which Power Input Do You Need?
Compare 110V (120V) and 220V (240V) welders on thickness capacity, duty cycle, circuit breakers, NEMA 6-50 plugs, and dual-voltage options.
- Best MIG Welders for Beginners
Compare MIG welders for beginners on input voltage, duty cycle, amperage range, and thickness capacity using manufacturer specs.
- Best TIG Welders: What to Look For and Top Picks
Compare the best AC/DC TIG welders on amperage range, high-frequency start, pulse control, duty cycle, and input voltage using manufacturer specs.